
Cassidy found a new place to read:

I had a little stamping energy this week, so I did make a birthday card for my SIL. She works tirelessly at keeping a nice house for my brother and her family, is a great cook and a wonderful friend. She loves country and is probably the best gardener I’ve even seen—to my dismay, because even with a farmer and a florist in my family, the gardening gene did not pass down to me! Anyway, I used one of my favorite Crafty Secrets gardening images with this week’s Retro Sketches sketch:

And here is my gardening-themed creation:
I stamped my image in Bordering Blue on a little scalloped tag and colored it with some ink and a blender pen. I dyed some seam binding and added a little felt flower. Here’s a little closeup:
I know the Retro Sketches designers tend to lead toward more funky, tendy, CAS designs, but I loved the sketch and put my vintage spin on it. TFL!
Happy Monday, everyone! It’s time for another Merry Monday sketch for your Christmas card creating! It is supposed to be quite warm here today, so it feels a bit odd to be making Christmas cards! But won’t we be happy in December? Here we go:

Hmmm…..lots of possibilities here with that trio of stripes and those two embellishments! I can’t wait to see how you interpret the sketch! Believe it or not, there is no stamping on my card at all today! I just let the paper do ALL the work!
Everything here is from Lost & Found Christmas by My Mind’s Eye. I cut out various elements from one 6x6 sheet and adhered them to fit the sketch. I did switch the embellishments around, adding a cutout star and bell diecut to the lower left and a vintage Santa to the right. I added a couple of corners punched using SU’s Postage Stamp punch. The background panels are from the same pad. As always, if you have questions about anything used here, be sure to send me an email!! Now let’s see what you can create!!! And be sure to check out Always Playing with Paper to see what the other creative hearts have done!
DH threw out a few old cranberries from our freezer a while back, thinking the birds would enjoy them. Well, the birds didn’t eat them, and no amount of warm, cold or rainy weather disintegrated them at all! Cassidy was quite fascinated by them….don’t worry, I gathered them up and chucked them before she got her hands on them:
Thanks for visiting today!!! Be sure to stop back tomorrow to see the ColourQ challenge!
Happy Sunday, everyone! I appreciate all the well-wishes while I was under the weather. I kept myself busy looking at all the wonderful creations that everyone made with my color combination from last week’s Paper Players challenge! So many creative hearts out there! I’m feeling a bit better, not 100%, but I did have enough energy to make a card for the Paper Players today, where the lovely Jaydee is our hostess with a clean and simple watercoloring challenge:

I recently got this cute little Ronald McDonald set called Turtle & Co. SU donates $3 to the Ronald McDonald House charity for each one purchased. I am planning an upcoming stamp camp for get-well and sympathy cards and I thought this was a good set to have! So here is my little get-well turtle card:
For some reason, I had the color combo of green & orange in my head when I made this card, so that’s what I went with! He’s got a glittery heart, and a glimmer brad for a little spunk; he’s stamped on watercolor paper with Stazon ink and colored with Pumpkin Pie, Certainly Celery and Wild Wasabi inks. I am not an “exact science” kind of water colorer….I always say that I color “loosely”! Here’s a closer view:
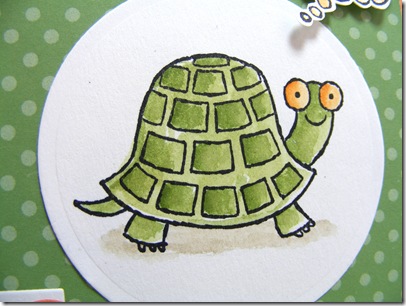
I don’t worry if I go out of the lines a little, or my shading isn’t blended perfectly. That’s just the style that I like. “Less is more”, IMO! I know a lot of people are intimidated by watercoloring, but I find it one of the most rewarding ways to color my line images! I always make sure of a couple things:
Other than that, the only other recommendation I have is to use an aquapainter. I have spilled too many cups of water on my desk from paintbrushes sticking up, and the aquapainter has a reservoir which allows water to flow to the brush but not spill. I squeeze the handle a few times to get the water flowing and then have a towel handy to blot the excess. I just use a couple drops of reinker ink in the lid of my stamp pad; you can start with just a tiny amount first to get a light color. It is much easier to layer on more color and shading than it is to remove color! It’s also helpful to dry your image with a heat tool before adding shading, or coloring different areas of your image. That way your colors won’t bleed together. But if you don’t have an aquapainter, you can still use a paintbrush & water! Don’t let that stop you!
I hope that you will be encouraged to give watercoloring a CAS creation this week a try! Mosey on over to the Paper Players blog to see what the other designers are sharing…..you’ll be amazed!
Here’s my little ham, eating a strawberry:
Hi all! I have one card to share and then I will be taking a little blogging break…..I have been fighting a sinus infection for over a month and it has come back with a vengeance, so I’m going to take a little breather and try to recuperate. I’ll be back on Sunday for the Paper Players challenge. Maybe, just maybe, if I feel a bit better, I can return sooner! I covet your prayers, as I have never had an illness or my allergy issues linger this long!
My card uses the Try Stampin’ on Tuesday sketch #61:

I wanted to do some watercoloring and the image I had in mind fit the sketch better if I turned it on its side:
I stamped the image and watercolored it with some reinkers and an aquapainter, then decided to use the Designer Frame to emboss it…..and I did it upside down! But I liked the effect, especially how the eggs “sat” in the little scallops on the side!
The rest of the card uses images from the same set, Nature Walk and French Foliage as well. Lots of embossing, a little piece of First Edition newsprint and a couple pieces of ribbon & lace, and it was done! If you have any questions about what I’ve used here, please send me an email (not a comment!)!
Since I have been too sick to watch the baby, I don’t have any fresh photos to share, but I do have a couple of my indoor flowers. My Christmas cactus decided to throw out a couple of blooms, and my African violets are bursting out of their pots. I am good at getting them to bloom but not so good at pruning and repotting them! Here you go:
Sorry, I take better picture of cards than I do flowers!! See you on Sunday!
Happy Tuesday, peeps! Another striking color combo from Arielle with a retro feel to it for today’s ColourQ challenge:
I snagged the Fall to Layout #185 from Clean & Simple this week:

and got to stampin’! Here you go:
I just love how this turned out…..a PTI floral image colored with Copics, some retired SU DP and a sentiment from Curly Cute. The fun border is made from 3/4” circles punched from Poppy Parade cardstock and adhered to the back of the DP (which I cut by tracing a saucer on the back!!!). The finishing touch was that pretty SU brad in the center of the flower!
I hope you’ll find some time to stamp something with these fun & funky colors! Be sure to boogie on over to the ColourQ blog to see what our other AMAZING designers have created. I am continually inspired by them and by you!!! Have fun!