Showing posts with label Anniversary. Show all posts

Saturday, January 14, 2023

TGIF403 Happy Anniversary

Happy Saturday, peeps! I am busy getting ready for my Hostess Appreciation party tomorrow!  I love hanging out with my stamping friends!  I did sneak in a little time to share an anniversary card for my special someone...it will be 24 years on Monday!  I used the sketch from TGIF:


and some new (and old) products from the SU mini catalog!  Here we go:


I used some Night of Navy DSP from the Regency Park collection and paired it with some wildflower paper from the retired Heart & Home DSP; hopefully John won't think it's too feminine!  But I loved how the two looked together!  I stamped the hearts in Night of Navy as well and added a sentiment from Love For You. 

 The inside was a combination of Love For You and Country Bouquet:


Clean, simple and easy!  Thanks for visiting today!


Project Details—All Products SU! Unless Otherwise Specified
Stamps Love For You, Country Bouquet
Card stock & Papers     Basic White, Regency Park DSP, Heart & Home DSP (ret)
 Ink Night of Navy
Accessories Dimensionals
Tools     Cut & Emboss Machine, Love For You Dies, Stylish Shapes Dies, Country Bouquet Punch

Friday, August 5, 2022

Fusion Anniversary

Happy Friday, everyone....wow, where did that week go?  My garden has been keeping me busy and I feel like I am drowning in peppers, green beans and tomatoes...and oh, zucchini too!  I should not complain because come winter we will have lots of goodies in the freezer to remind us of summer days!  

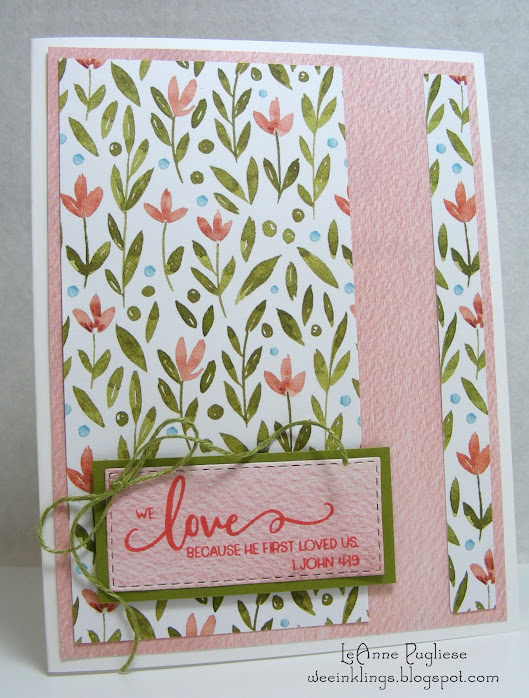
I have a quick card today using the sketch from Fusion:

I needed an anniversary card for a couple in our church small group and I thought the sketch would be a good one!  I used some papers from Awash In Beauty, and a Bible verse from a Stamp Simply set:


Rather than cut a separate vertical piece, I chose to cut two pieces and mount them on the background piece (hoping it's all not too feminine for the husband of the couple!!!!).  I used another piece on which to stamp my sentiment, adding an Old Olive mat and some Old Olive Linen thread for a wee bit of embellishment:


My supply of "Happy Anniversary" stamps is pretty limited, but I did find this pretty one in a Hero Arts set:

And it's off in the mail!  Thanks for popping in today!

Thanks to the slow pace of the USPS, I am still getting birthday cards!  These did make it on time, though!  This cutie is from my friend Debbie...he makes me smile!


And talk about a stunner!  Peggy added all those lovely blossoms to that gorgeous DSP...so very pretty!


This little whimsical beauty is from my friend Fran....aren't those little lady bugs the cutest?


And Bonnie wowed me with this beauty....the simple layered background with white embossing is perfect for that embossed butterfly!


Thanks, ladies! I feel special!  Enjoy your day and be blessed!


Project Details—All Products SU! Unless Otherwise Specified
Stamps Farmhouse Scriptural Quotes (Stamp Simply), Sentiments CL342 (Hero Arts)
Card stock & Papers     Basic White, Old Olive, Awash in Beauty DSP
 Ink Calypso Coral, Old Olive
Accessories Dimensionals, Old Olive Linen Thread (ret)
Tools     Big Shot, Stitched Rectangle Dies

Monday, March 7, 2022

Casology Straw Hat Anniversary

Happy Monday, peeps!  Weird weather this weekend....very warm for March.  It makes me nervous, like we're going to get "rewarded" with a snowstorm next week or something, LOL!  Anyway, can't do a thing about it so I just go to my stamp room and stamp!  A couple in our church are celebrating their 70th wedding anniversary!  Casology had a fun challenge of "hat" and I had been wanting to use this straw hat image from one of my absolute favorite retired sets, Garden Pleasures.  


So here we go:


I needed my card to be really clean and simple, so I just placed my stamp (it's an old wood one but I took it off the block) in my Stamparatus and stamped it in Memento Black, cleaned it and then stamped again in Versamark without moving it.  Then I heat-embossed it with clear embossing powder and simply colored it with an aquapainter and reinkers.  Normally I don't like to watercolor on regular cardstock because it pills, but with the embossing and it being a smaller image, it worked great! 


I added a sentiment from the SAB set Special Moments and a few speckles from Color and Contour, then stamped my sentiments from the retired Number of Years on the inside:


70 years is amazing.....a real testimony to their commitment to each other and to the Lord!  Thanks for popping in today!

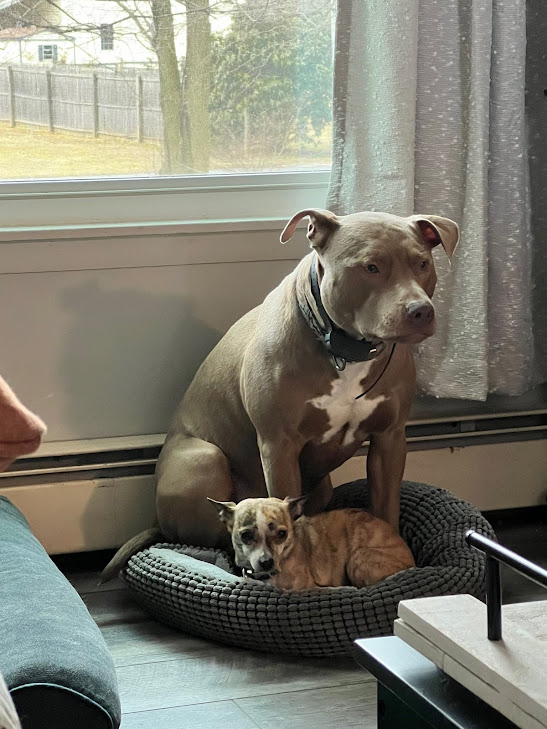
The saga of Eden and the dog bed continues:


No caption needed, LOL!  Enjoy your day and be blessed!


Project Details—All Products SU! Unless Otherwise Specified
Stamps Color and Contour, Special Moments (ret), Garden Pleasures (ret), Number of Years (ret)
Card stock & Papers     Very Vanilla
 Ink Versamark, Memento Black, Crushed Curry, Bumblebee, Cinnamon Cider, Misty Moonlight, Flirty Flamingo
Accessories Clear Embossing Powder
Tools     Aquapainter, Corner Rounder Punch (ret), Heat Tool, Stamparatus

Monday, November 1, 2021

Inside Pop-up Fold Card Directions

Happy Monday, peeps!  Fall has certainly fallen here in SE PA!  Brrr!  Mother Nature can't make up her mind as to whether she wants rain or sun!  I had a request from a reader for directions to make this card, but she didn't leave me her email, so I'll do a quick tutorial.  (If you need more detailed instructions, just email me, don't leave it in the comments.)  I needed a 60th anniversary card for a couple at church and decided to use that as my sample; it's pretty basic, no extra stamping, but you should get the idea!  Here's the card to get us started:


And the inside:


So to start, you'll need an 8 1/2" x 5 1/2" piece of cardstock, scored on the 8 1/2" side at 2 1/8" from each end to create a gate-fold card.  You can decorate the front however you desire.  Take a piece of designer paper that is 4" x 8" and score on the 8" side at 2" and 6".  Make a little pencil mark at the top and bottom of the paper at the 4" mark, which will be at the halfway point.  Score diagonals like this:


You'll be scoring from each outside corner to the opposite halfway pencil mark.  (You'll be making four diagonal scores.) Fold and burnish on all the fold lines.  Pinch the folds at the 2" and 6" mark so they fold towards you, and the center diamond stays to the back:


Now is the time to decorate the diamond panel, BEFORE it's glued down, as well as doing any stamping on the inside top and bottom of your card, if you desire.  I chose not to do any on this card.  For my diamond panel, I stamped some images from Number of Years (ret):


To adhere it to the center of the card, I found it was easier to fold it all together and use liquid glue to adhere JUST the bottom diamond portion to the inside of the card, centering it.  Using the liquid glue allows you to wiggle it around a bit if it's not positioned quite right.


Once that portion is secure, you can adhere the outer triangular shaped panels to the inside of the card sides.  Just make sure, again, that everything is even and nothing is sticking out over the edge of the card.


You can add a decorative panel to the front, just make sure that you only adhere it to one side so that the card can still be opened.  I diecut my numbers from the retired Large Numbers die, and used the Stitched Shapes and Pierced Blooms for my panels.  To hold it shut, I used a ribbon under dimensionals for this card, but my friend Karen used small velcro dots and on my Halloween card, I used small magnets.  Use your imagination!  Hope this was helpful so that you can make your own pop-up card! Thanks for popping by today!  

As a child, I was never into spooky, scary Halloween costumes, but my granddaughter apparently is!  She made her own "zombie soccer player" costume....whatever!  They bought all the pieces at the local Goodwill and she did her own zombie-ing to it!!!


Enjoy your day and be blessed!

Project Details—All Products SU! Unless Otherwise Specified
Stamps Number of Years (ret)
Card stock & Papers     Basic White, Misty Moonlight, Harvest Meadow DSP
 Ink Misty Moonlight
Accessories Dimensionals, White Twill Ribbon (ret)
Tools     Big Shot, Stitched Shapes Dies (ret), Pierced Blooms Dies, Large Numbers Dies (ret), Ornate Flowers Embossing Folder, Scoring Tool

Sunday, June 23, 2019

PP447 Happy Anniversary


Happy Sunday, peeps!  It's time for another Paper Players challenge, and we have a sketch this week from Jaydee:


What a great sketch, with TONS of possibilities!  My busy week got away from me and we decided to make a quick trip to the beach yesterday to clean out the last things from my dad's house, so I needed to make this card fast and simple!  I used some pretty DSPs from my stash of 6x6 papers, and added a sentiment from Beautiful Bouquet to celebrate our friends' upcoming anniversary:


The Stitched Nested Labels dies make for such an impressive focal point for a simple sentiment:


I love it when the papers do most of the work!!  And I hope you'll find some pretty papers with which to play along!  We always love to see your creations in the Paper Players gallery!  Check out what the rest of the DT did at the Paper Players blog!

Summer fun!


Jackie kept asking me to take a "selfie" of her, LOL!


Enjoy your day and be blessed!

Project Details—All Products SU! Unless Otherwise Specified
Stamps Beautiful Bouquet
Card stock & Papers     Naturals White, Flirty Flamingo, Homespun Gingham DSP (My Favorite Things), I Am DSP (Simple Stories
 Ink Flirty Flamingo
Accessories Dimensionals
Tools     Big Shot, Stitched Nested Labels Dies

Saturday, September 8, 2018

Two Easy Cards

Happy Saturday, peeps!  I have two easy cards for you today...I spent some time in my stamp room today (instead of doing chores, I am such a procraftinator!), and the first one is for Dana and Wayne's first anniversary, which is tomorrow:


Blessedly, the weather last year was very cooperative; if they had gotten married this year, they would have needed umbrellas just like Kelly!  I used the FMS sketch for this one by Jen, it's really clean and simple, which was perfect for what I wanted:

Dana likes purple, so I used some Highland Heather as my card base and layered it with some pretty heart-embellished SU vellum from several years ago.  I heat-embossed a sentiment from Beautiful Bouquet and added some gold diecuts:


Sadly, my second card is for a close family/church friend who has been battling health issues for several years; he came home from the hospital last night and passed away early this morning.  We know it is a blessing, as he was in a lot of pain, but we still miss him!  The sketch from Sketch Saturday gave me a chance to use some pretty papers from Share What You Love:


And here's the sketch:


I already had a Mint Macaron card base cut and scored, so I layered my DSP on a Petal Pink mat and adhered them.  The beautiful velvet ribbon from the Holiday Mini matched nicely, and I colored a pearl with a Light Pumpkin Pie Blend marker and adhered it for just a little extra something:


My sentiments, inside and out, are from Flourishing Phrases, stamped in Soft Suede, and I added some leaves from Perennial Birthday, stamped in Soft Sea Foam:


Hope you have a blessed day, thanks for popping in!  Be sure to come back tomorrow for a new Paper Players challenge too!


Sunday, July 8, 2018

PP400 Take Two


Happy Sunday, peeps!  I hope your weekend is going well!  I suddenly came down with some allergy symptoms and sore throat, which is really annoying me, considering how nice of a weekend it is!  All I want to do is sleep!  


Anyway, our 400th Paper Players celebration continues, so if you didn't get a chance to play last week, you have another week to try!  For my card this week, I went in a different "celebration" direction...this card is for a couple in our congregation who just celebrated their 65th wedding anniversary!  The husband happens to be my dad's first cousin, so I guess that makes him my second cousin!  My grandmother was his aunt, and I can always see a family resemblance to her when I see him on Sundays, and he has never lost his sense of humor despite many illnesses!  So he and his wife are very special to me!  I used Brushed Gold and Chocolate Chip cardstocks to create the letters, and some beautiful Graphic 45 paper for the background on this large, but simple card:


The sentiment banner was cut with a die from the Large Numbers die, and stamped with a sentiment from Beautiful Bouquet.  I did a wee bit of shading with a blender pen and some Sahara Sand ink to give it a 3D effect...I just love how this looks!  I backed it with another banner in Chocolate Chip as well, to give it even more depth:


SO....we hope that you'll enter your celebration creation over at the Paper Players blog, and just in case you didn't see all the sponsors and prizes, you NEED to check it out, as well as the gorgeous creations from the DT!  Hope to see you there!

Last week in the pouring rain, John came out of the garage and almost stepped on this:


It was pretty unusual for a snapping turtle to come so close to the buildings...it looks like he was wanting to take a bath from the rain spout!!!  Hopefully I'll have some Cassidy pictures next week, as she'll be back tomorrow!  Have a blessed day!


Project Details—All Products SU! Unless Otherwise Specified
Stamps Beautiful Bouquet
Card stock & Papers     Very Vanilla, Chocolate Chip, Brushed Gold (both ret), Time to Celebrate DSP (Graphic 45)
 Ink Chocolate Chip (ret), Sahara Sand
AccessoriesDimensionals
Tools     Big Shot, Large Numbers Thinlets, Blender Pen

Sunday, April 8, 2018

Paper Players 388 Congrats


Hi everyone!  Sunday means another Paper Players challenge, and I am the hostess today with a color challenge for us!  I find purple shades very challenging to use...I like them, but I can't always figure out how to use them.  I was sad to see the Amethyst color retire several years ago....SU replaced it with Wisteria Wonder and it just has too much gray in it for my liking!  But I digress!  Here is the color palette, I hope you like it and will play along with us:


True to form, I struggled with my own challenge!  I finally decided on something "light"...I had some watercolor paper on my desk from my crafting earlier in the week, so I dabbled some water on it, then added some Wisteria and Eggplant inks to it, then stamped some florals from Beautiful Bouquet on top once it dried:


For fun, I did a partial diecut, leaving the stem intact, added the little bow diecut from the set, a few sequins and a Tranquil Tide mat from the Layering Circles Framelits:


I mounted it on a Very Vanilla panel that was embossed with the Perfect Polka Dots EF, then mounted that on a Wisteria Wonder mat and an Elegant Eggplant card.  My final addition was the sentiment,  from the same set, diecut with a banner die, and a "Happy Anniversary" sentiment on the inside:


As I said, I hope you'll play along with us!  Unlike me and my struggle, the DT seemed to have no problem coming up with some amazing creations!  Check them out:

·        Claire
·        Jaydee
·        Joanne
·        Laurie
·        Nance
·        Sandy
·        Elizabeth
·        Annie
·        Jan


Despite the stubbornness of spring, which really doesn't want to make an appearance, we did have a day over a week ago that was vaguely warm; it wasn't warm enough to warrant bare feet, but Cassidy and my great-nephew seemed to think it was okay as they did some "digging" in my SIL's woods:


I had to draw the line at playing in the creek in their bare feet...it was still March, after all!  But they got some fresh air and much-needed outside exercise!  Enjoy your day and be blessed!

Project Details—All Products SU! Unless Otherwise Specified
Stamps Beautiful Bouquet
Card stock & Papers     Wisteria Wonder, Elegant Eggplant, Tranquil Tide, Very Vanilla, Watercolor
 Ink Wisteria Wonder, Elegant Eggplant, Tranquil Tide
Accessories Sequins (Sylvia's Etsy Shop)
Tools     Big Shot, Perfect Polka Dot EF (ret), Stitched Shapes Framelits, Bouquet Bunch Framelits, Aquapainter, Dimensionals, Banner Die (Nestabilties)